You can now assign multiple administrators to your Briskine team, making it easier to share management responsibilities and keep your team organized.
Previously, only the person who originally created the team and upgraded to the premium plan had admin access. That meant just one person could manage the subscription and make changes to the team. With this update, you can now give admin rights to others on your team, making it easier to share responsibility.
Administrators can manage team members, upgrade or modify the subscription, and assign or revoke admin access. You can have as many administrators as your team needs.
To make someone an administrator, go to the Team page, click the three-dot menu next to their name, and press Make administrator. If you need to remove admin rights later, you can follow the same steps and choose Revoke administrator.
This update is especially useful for larger teams or when the original admin isn't available. It gives your team more flexibility and helps keep things running smoothly.
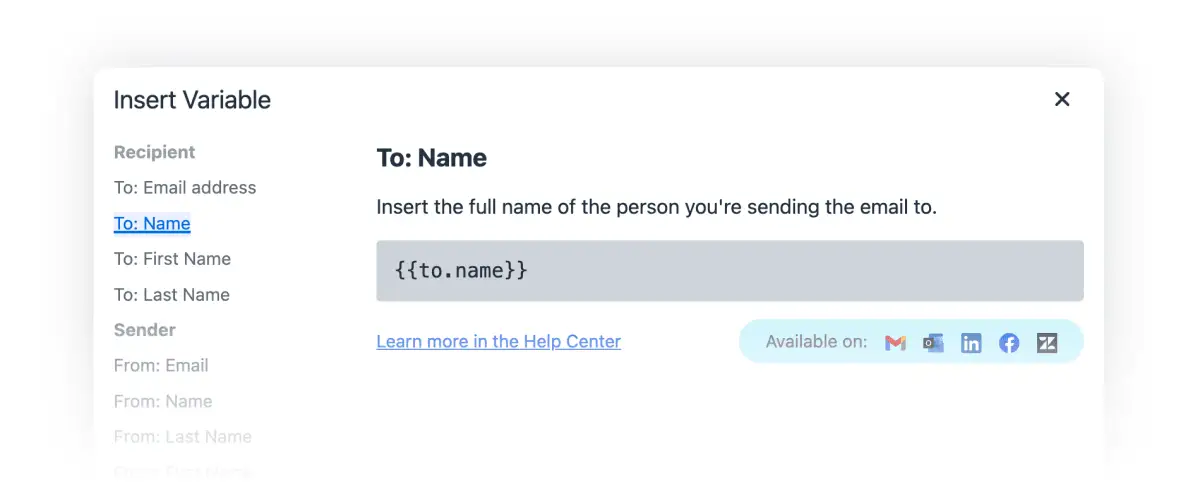
Briskine lets you add dynamic content to templates by using variables, helpers, and partials. Instead of manually typing in details like names or dates, Briskine inserts them automatically, saving time and reducing errors.
Using variables for personalized messages
Variables act as placeholders in templates and are replaced with real-time data when inserted. For example, {{to.first_name}} automatically adds the recipient's first name in emails or messages. Other available variables include the sender’s name, CC or BCC recipients, email addresses, and email subjects. These variables maintain a personal tone while reducing manual input.
To prevent missing names, the {{or}} helper sets a fallback value.
Writing Hi {{or to.first_name "there"}}, ensures the greeting always includes a name or a default word. This will make sure there are no awkward gaps in messages, such as "Hi ," instead of a properly formatted greeting.
The {{moment}} helper automatically inserts dates and times. It can add the current date, calculate a future or past date, or specify the next occurrence of a particular day. This is useful for setting deadlines, scheduling follow-ups, or creating end dates for offers.
For example, {{moment add="7;days"}} inserts the date seven days from now, which helps with reminders or meeting confirmations. Meanwhile, {{moment add="1;week" isoWeekday="Monday"}} retrieves the next Monday's date, making scheduling easier.
By default, dynamic dates follow your device's date format and time zone settings, but you can override them for specific templates if needed. For example, {{moment locale="fr"}} inserts the current date in French.
Text helpers format text, extract key information, or replace characters. This can guarantee proper capitalization, or pull details like domain names from email addresses.
{{capitalizeAll to.name}} capitalizes first and last names correctly, even if entered in all lowercase.
{{lookup (text to.email "split" "@") 1}} extracts the domain from an email address, making it easy to identify a contact’s company or service provider.
Conditional helpers adjust content based on available data, time of day, or other factors. They can personalize greetings based on when an email is written or adjust responses depending on whether a recipient's name is available.
The {{or}} helper can make sure a value is always present, preventing blank spaces or missing details in messages.
For example, combining a conditional if with the {{compare}} and {{moment}} helpers, you can use a different greeting depending on when you're writing the message, with:
Partials simplify template management by reusing pre-written content, making updates easier and keeping messages consistent.
Instead of rewriting the same details repeatedly, you can store commonly used text as a separate template and reference it in others. A company address, for example, can be stored separately and inserted with {{> address}} in multiple templates. Updating the main address template automatically updates all instances where it appears.
Partials are useful for email signatures, phone numbers, disclaimers, or any frequently repeated information. If company contact details change, updating the main template will keep all templates accurate without requiring individual updates.
To quickly add commonly used variables and dynamic elements, press the 💎 Variables button in the Briskine template editor.
Biskine's dynamic content features will ultimately save you time and effort. Whether inserting names, dates, or frequently used text, they help create personalized content with less effort. Templates automatically adapt to the context, so you won't have to make manual adjustments once they're inserted.
For more details and examples of using dynamic content, visit the Briskine Help Center.
You can now include templates in other templates with our new feature, template partials. This allows you to reuse specific templates, like email signatures or contact details, and speed up responses.
Template partials allow you to include one template within another. This means you can create reusable components and include them in multiple templates with ease. No more repetitive copy-pasting!
Using partials involves a special syntax that references other templates using their shortcuts. This is the same shortcut text you use to insert templates with the ⇥ Tab key.
For instance, you can create an email signature template and use it as a partial in many other templates. If you update the signature template, all the templates that include it as a partial will automatically update as well. This is how you’d include the signature template in another template:
{{>signature}}
Template partials also come with advanced features, including:
Complex Layouts: Design intricate email and message layouts with ease.
This new feature is perfect for creating consistent and maintainable templates. Imagine setting up a standard email signature and using it across all your email templates. Change the signature once, and it updates everywhere.
We’ve added a brand new right-click context menu for Briskine, to help with performing the most common actions. Now, in addition to using the dialog or template shortcuts, you can quickly insert templates directly from the context menu.
Different options will be available in the context menu depending on where you right-click on the page.
To insert templates, right-click on any editable text field, and choose the template from the list. We’ve only added 30 templates to the context menu, to avoid having too many items there.
The templates in the context menu are sorted with the same settings you’ve chosen for the Briskine dialog. For instance, if the templates in the dialog are sorted by Recently Used, the context menu will display the 30 most recently used templates.
You’ll also be able to open the Briskine dialog, without having to use the bubble or the keyboard shortcut, by right-clicking on an editable text field.
When you select text on the page, you’ll see a new option to save the selected text as a new template.
From the context menu you can also open the Briskine popup, to help you with signing in or out of your account. This is an option that will always be available, regardless of where you right-click on the page.
If you need more help with this, we’ve got a new page with detailed instructions and screenshots of the Context Menu in the Help Center.
Managing templates efficiently is crucial for productivity, especially when dealing with a large number of templates for different projects. With our latest improvement, you can now update the contents of multiple templates simultaneously.
Previously, while you could change tags or sharing settings in bulk, updating actual template content required more effort. Each template needed to be individually updated, which could get time-consuming.
Suppose you recently rebranded your company and need to update all templates to reflect the new name. Instead of manually editing each template, our bulk update feature allows you to make this change efficiently.
Or maybe there’s a specific word or phrase you want to cut from several templates. Whether it’s outdated terminology or irrelevant content, our bulk import functionality streamlines the task.
The new feature is part of our Template Import tool, so you’ll need to be with familiar HTML code and CSV files. Here’s how it works:
Export Templates: Begin by exporting your existing templates. This step generates a CSV file containing all necessary information.
Edit the CSV File: Open the CSV file and locate the template HTML code. Make the necessary changes—whether it’s removing a specific word (e.g., your company’s old name) or updating other content.
Import the Updated Templates: Import the modified CSV file back into the dashboard. You’ll receive a confirmation message listing the new and changed templates detected in the file.
The confirmation message ensures you’re aware of the changes before making them.
For a comprehensive guide on using this feature, including the import file format and how change detection works, see the Import Templates article in the Help Center.